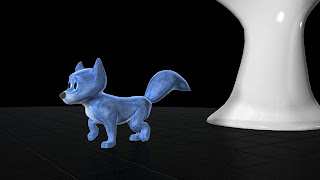
I realised I was being quite ambitious, wanting to animate a quadruped when I have only worked with a biped a couple of times. My rig that I created for my alien character wasn't as accurate as I would have hoped, I ended up rigging the front legs wrong so that it bent the wrong way. When it came to animating I just had to work around this and do the best I could with what I had. I looked at a lot of reference videos to get a better understanding of how quadrupeds walked, especially cats in particular. I then took one video and broke it down into the main poses, contact, down, passing, up, contact. By doing this I had a clear image of each pose and could then work from these to block out my animation.
As my alien was jumping down from a tree I found a really useful video that I ended up referencing a lot. It was really helpful that it was in slow motion as well as I could take my time going through the video and analyse each shot and see how the body reacts through the air and on impact. There's a lot more to take into consideration when animating a quadruped, the legs have to work with each other yet they are offset at different points.
I also decided to follow a proper workflow this time, in the previous module I had tried to block out my animation first and then change this to spline, however I had a lot of issues with it and ended up just working straight from auto-tangent. This time I wanted to try again and I actually succeeded, by blocking out just the key poses first and not worrying about timings it makes things a lot easier. You are able to just concentrate on building good poses and putting in key ones to build your foundation. From here I then went in between and put breakdowns, the computer needs as much information as possible, without the necessary information it will just guess. Which is the issue I had before, I wasn't detaield enough with my blocking. The more time you spend in blocking, the easier it is when it comes to clean up. Below is the final stage of the tree jump animation, I'm really happy with this as I feel like I have a better understanding of the whole process and can progress this further next time. Blocking, adding in breakdowns and then going into spline is a far easier and cleaner workflow than what I was previously doing.
Wednesday, February 27, 2013
Tuesday, February 26, 2013
Location / Green Screen Shoots
A major part of this project was to film the footage we needed for our shorts. As we were all given the same first 4 shots, we filmed this outside college as a group under the guidance of Annabeth and Mat. Some people took specific roles whilst others were extras within the film, for myself I undertook the role of Assistant Director. It was my job to get everyone into position before each shot and tell the camera assistants when to start rolling. When the camera was up to speed, by calling out 'mark it' this is when the clapper board comes in to detail what shot it is and what take.
There were a few things we had to take into consideration when filming out in public, the main one was trying to deter people from walking across the area we were filming. We used barriers and tried to film when it was the most quiet, i.e before everyone went on lunch. Because we used extras in our shoot it wasn't the end of the world if a member of the public walk on shot as they would hopefully just blend into the background.
There was only one major shot where we had to use a green screen for, and this was for the abduction scene. We first filmed the actor in front of the green screen and then with the camera in exactly the same position, filmed a back plate shot. The camera needed to be in the same position as otherwise the green screen footage would not marry up to the back plate.
The second shoot involved filming indoors as this was mainly green screen. This time we had to pay attention to the lighting, we wanted to have as little shadow as possible casting onto the green screen, this would make keying out easier. Also the more you can do on film the better, so by setting up the lights to how we would have them in Maya was important. It's all about the continuity and the seamless integration.
It was also important to have our storyboards completed when it came to filming as this not only helped communicate our ideas better with our actress, Jeff but also sped up the process. As Jeff had a fair few people to film with we didn't want her to act anymore than she really had to. Knowing what you want was key and it also keeps you on track, if you don't stick to your storyboard you could run out of time in the end and have too many different options to work with. A big part of this module is about organising time as there is a lot to achieve in a short amount of time.
I thought the filming was quite successful, even though in the first shoot I felt we didn't get enough variety in the shots so my beginning sequence of footage isn't as interesting as I would have liked. Everyone pitched in and help set up and we got to each be the director of our own footage so it was a new experience for most of us.

Sky Replacement
When we filmed out on location, the sky was very grey and bland, so I decided to create a sky replacement to make it more interesting and visually appealing. I had already done a basic one on a test of the first shot awhile back but now I thought it would be better to advance this and create something I was more happy with. I wanted the sky to change colour as the spaceships came into view and I came across this tutorial which proved to be really useful. I took what I learnt here, about adjustment layers and the use of CC Rain and CC Mr. Mercury to create a comp that pushed my skills further.
I took the basics and adapted it to suit my comp. In the first shot I keyframed the different types of colour correction I used on the adjustment layer and sky layer, in order to achieve a gradual change in colour when the ships appeared. Because I did this to the first shot, I also had to do the same on the other two shots after it for continuity. The edit below is not finished at all, there are still tweaks I need to do on the compositing, especially changing the rain effect. Even though it was quite visible when I first made it, it could do with increasing in size so it is slightly more visible to the eye, at the minute it blends too well into the background and the droplets are too thin. Obviously as well, my animation isn't fully rendered, these are just playblasts. It's just in this stage at the minute as I have to send this off to John Waugh, the guy who has offered to do my music for me and the main thing that he needs is for the timing of each shot to be how it is when it is fully finished.
I took the basics and adapted it to suit my comp. In the first shot I keyframed the different types of colour correction I used on the adjustment layer and sky layer, in order to achieve a gradual change in colour when the ships appeared. Because I did this to the first shot, I also had to do the same on the other two shots after it for continuity. The edit below is not finished at all, there are still tweaks I need to do on the compositing, especially changing the rain effect. Even though it was quite visible when I first made it, it could do with increasing in size so it is slightly more visible to the eye, at the minute it blends too well into the background and the droplets are too thin. Obviously as well, my animation isn't fully rendered, these are just playblasts. It's just in this stage at the minute as I have to send this off to John Waugh, the guy who has offered to do my music for me and the main thing that he needs is for the timing of each shot to be how it is when it is fully finished.
Monday, February 25, 2013
VFX in TV compared to film
Murray Barber from The Mill a VFX company down in London did a talk at Animex which I found really relevant and useful for the visual effects module I'm currently working on. Because The Mill does a lot of visual effects for TV, Murray spoke about how they achieved their effects on a budget and a tight deadline. Budget actually plays a big part within TV as it will determine what can be included and if there is time to create something large scale. To overcome this they tend to re-use assets from previous shows, altering them slightly to fit in with their new surroundings. Working in TV, you build up a vast asset library which you need to use to your advantage, it saves time and that time saved can be spent on something that require more detail and effort. Because of time constraints it's best to try and get involved in the script writing stage if possible, this then allows communication between the studio and script writer to advise them what is achievable for the budget and time scale.
Below is a quick making of from The Mill of series 5 of Doctor Who, you can see that even with the time restrictions and budget they are still able to create high end visual effects. Instead of creating numerous amount of set extensions, they use matte paintings, something that requires less work yet produces the same visual effect. It's tricks like these that can work in your favour, why model every tiny detail when it will only be seen from far away.
Working in TV is very much fast paced, especially commercials. In film, you would get far longer working on a section and have the time to make every detail perfect. TV, you have to find the right balance of sending it out on time yet also creating something visually appealing that will grab the audiences attention.
Animex Talk
Animex Talk is more directed at animation than games, having the two sections gives a good mix of both industries and you are also able to see the similarities between the two, along with some differences. Everything that I have taken from Animex Game is still relevant to my animation practice, any advice can be adapted to suit your own area of work.
Day 1:
Ed Hooks was a really inspirational speaker, he teaches acting to many animators and spoke a lot about the industry and where it was going. One thing to bear in mind is that we should all consider ourselves as global, work will take us anywhere and we need to have an understanding of the industry and follow it wherever it goes. Need to be aware and involved. If you want something, you should go out and get it, if you don't try you won't get. A thing that was brought up time and again by each speaker was connections. It was all about the people you knew and most of them had got their jobs through people they knew within the industry. David Au said make a lot of friends and never get too comfortable as there is no stability within the industry. He reminded everyone that they'll be working long hours to reach a deadline and even though this may not bother some people, in the long run you have to set yourself goals, you don't want to be working through the night when you're a lot older.
Alastair McIlwain of Straandlooper bought up an interesting point, that the technology we use is forever changing and that can affect the way we design, produce, view and distribute the work. It's something to keep an eye on as even with softwares, each year there is a new version with tweaks and actually new areas to increase productivity and the way we work. We have to be able to adapt to these new pieces of software and to make the most of them. Will Becher from Aardman attended Animex and although I had previously seen him at Bradford Animation Festival and it was a very similar talk; it just reminded me how much work actually goes into making a stop motion feature film. It will always amaze me at all the little details they put in and I have nothing but admiration and respect for everyone working within that industry.


Day 1:
- Ed Hooks, Acting Instructor and Author
- David Au, Storyboard Artist / Assistant Director
- The Mill - Murray Barber, VFX Supervisor
- Stuart Sumida, Professor of Biology
- Rhythm & Hues Studios - Hans Rijpkema
Ed Hooks was a really inspirational speaker, he teaches acting to many animators and spoke a lot about the industry and where it was going. One thing to bear in mind is that we should all consider ourselves as global, work will take us anywhere and we need to have an understanding of the industry and follow it wherever it goes. Need to be aware and involved. If you want something, you should go out and get it, if you don't try you won't get. A thing that was brought up time and again by each speaker was connections. It was all about the people you knew and most of them had got their jobs through people they knew within the industry. David Au said make a lot of friends and never get too comfortable as there is no stability within the industry. He reminded everyone that they'll be working long hours to reach a deadline and even though this may not bother some people, in the long run you have to set yourself goals, you don't want to be working through the night when you're a lot older.
The Mill was up next with a talk from Murray Barber. It was interesting to see the differences between working for Tv and for film. The main one being the budget, because of this it can affect what can be achieved in the time scale and you need to be able to solve problems quickly. Stuart Sumida, originally a biologist, told us the importance of knowing how things work, people and animals. In order to create a sense of believability you need to study the skeleton to understand how joints move and work. People can tell when something is not accurate even when they don't know fully. Having seen Life of Pi when it came out in cinemas I was really looking forward to seeing more in depth view of how the film was created. The software and rigging system that was used for Richard Parker was actually adapted and evolved from the one used for Aslan in the Chronicles of Narnia, and Aslan was adapted from their first major film, Cats and Dogs. It's great to see how technology progresses comparing the final outcomes to it's predecessors. It will be interesting to see where this technology could be taken next as when Hans showed us both the real tiger and the CG tiger next to each other, I, along with many others could not tell the difference between the two.
Day 2:
- Straandlooper - Alastair McIlwain, Managing Director / Animator
- Aardman - Will Becher, Character Lead Animator
- MPC - Ferran Domenech, Animation Supervisor
- Double Negative - Andrew Whitehurst, VFX Supervisor
- Walt Disney Animation Studios - Rob Dressel, Layout Supervisor
Alastair McIlwain of Straandlooper bought up an interesting point, that the technology we use is forever changing and that can affect the way we design, produce, view and distribute the work. It's something to keep an eye on as even with softwares, each year there is a new version with tweaks and actually new areas to increase productivity and the way we work. We have to be able to adapt to these new pieces of software and to make the most of them. Will Becher from Aardman attended Animex and although I had previously seen him at Bradford Animation Festival and it was a very similar talk; it just reminded me how much work actually goes into making a stop motion feature film. It will always amaze me at all the little details they put in and I have nothing but admiration and respect for everyone working within that industry.
The next two talks were from 2 VFX companies situated down in London, Moving Picture Company and Double Negative. Ferran Domenech from MPC spoke mainly about the animation done within Prometheus which I found really fascinating as I had never properly looked into the way it is done within visual effects before. To make sure everything lines up in the end, they matchmove the footage and then from here they can start to animate. It was great to see the breakdown shots of the animation, from blocking through to the muscle system to the final outcome. One thing that Ferran mentioned was to always test the rigs out beforehand, you need to be sure everything works before you dive into the animation, if something is wrong it needs to be fixed straight away. With Double Negative, Andrew Whitehurst showed us two types of visual effects, a more invisible type used in Skyfall and more stand out obvious effects used for Scott Pilgram. Whether it's seamless or obvious each needs as much attention to detail as each other. The last speaker of the day and of Animex Talk was Rob Dressel, layout supervisor for Disney. Working in layout is very similar as previz, working out each shot of the film, camera and character positions, blocking out some rough timings and screen direction. I spoke to Rob the night before at the networking event and he said it's good to have an understanding of layout and cinematography and it can also help push your animation more. You know why the scene is laid out in that particular way and can use it to influence your performance. Another person I spoke to was comic writer, Jim Zub. He spoke about critiquing and that you always have to put your work out there to get better, it may knock your confidence but it should motivate you to improve and better yourself.
The whole week at Animex has really opened my eyes and given me so much knowledge and motivation to become better. I met and spoke to some great people and will definitely be attending again next year. For anyone who hasn't been, I can assure you it's well worth going. Teesside Uni have so many great connections and it wouldn't have been possible without Gabrielle Kent, festival director. Each year they have great speakers from round the world and unlike some other festivals this gives you a real chance to get to speak to them all and get that all important advice from professionals.
The whole week at Animex has really opened my eyes and given me so much knowledge and motivation to become better. I met and spoke to some great people and will definitely be attending again next year. For anyone who hasn't been, I can assure you it's well worth going. Teesside Uni have so many great connections and it wouldn't have been possible without Gabrielle Kent, festival director. Each year they have great speakers from round the world and unlike some other festivals this gives you a real chance to get to speak to them all and get that all important advice from professionals.


VFX Industry
This year has been huge for the VFX industry, so many blockbuster titles of this year have been heavily involved with VFX, none more than Ang Lee's Life of Pi. I went and saw this in the cinema and was completely blown away by the sheer beauty of it and the scale of the whole project itself. Because of it's tremendous job it was no surprise that Life of Pi was up for an Oscar for Visual Effects, however shortly after the nominations were announced, Rhythm & Hues - the company that created the bulk of the visual effects filed for bankruptcy. For myself and many others this came as a huge shock, a well established and reputable studio who just made one of the most visually stunning films in a long time were in a lot of financial trouble. Back in September another well known VFX studio, Digital Domain, had run into financial troubles which led to them closing down a studio out in Florida.
We as artists love what we do and because of this love, we aren't too bothered if we get the recognition as we all work behind the scenes. It's only when people start loosing their jobs and are under paid and have to work all hours, when people have something to say. Without these people, without these companies and studios visual effects work, it's as simple as that. The Oscars took place last night and around 500 people took to the streets to protest about the state of the VFX industry.
The protest is not a strike, "it is an effort to raise awareness," explained VFX supervisor Scott Squires
A lot of people were hoping that Life of Pi would win the Oscar for Visual Effects (which they did) and use that as a stage to create more of an awareness about the industry. They tried, but got cut off mid speech which gives you the impression that they couldn't care less. I'm hoping that this just pushes everyone more and gives them more determination to make their stand. It will be interesting to see how this will affect the VFX industry in the up coming months and hopefully it will be for the better. Here is an interesting interview about why the VFX industry is failing. A big thing to come up time and again is the model the VFX industry use, it's far different from any other within the film industry. In order for something to change within visual effects, the model they use needs to change.
Oscars 2013 - Life Of Pi Wins Best Visual Effects from Nathaniel Caauwe on Vimeo.
Sunday, February 24, 2013
Animex Game
Animex is held up at Teesside University in Middlesbrough, I wanted to attend last year but missed out on tickets so made sure I could go this year. The line up of speakers did not disappoint and there was a wide range from writers, composers, animators and art directors to name a few. The week was split into two, Animex Game and Animex Talk.
Day 1:
Richard Frankie from the Burnout series talked about the process he went through as an open world designer. A major point he brought up was about iteration, iteration is key. Develop your work and keep changing it. The Indie Development Panel was next, it was interesting to see that a fair few speakers came from AAA games before hand. They mentioned that they found at big studios there is a restriction on creativity there, you got more freedom being indie instead. The downside to becoming an indie developer first, is that there is always the issue of not having more experienced people to guide you, as you would have in the industry. You could miss out on learning certain things. When you do make your first indie game, it's best to create something to test your skills on and so you can work out how to improve from then on. It's easy to set up a company, it's harder to maintain and keep it going. IO Interactive, well known for the Hitman series also attended Animex. It's good to always think about the other disciplines/departments as well as your own when working with others. Whatever you create needs to work for the next person along in the production line.
The most useful and motivational talk for me was from Wyeth Johnson of Epic. It was a really great talk - very eye opening and useful. It really got me thinking about my work in a different way and how I could push it further. What was really helpful is that Wyeth spoke about the do's and don'ts of what to include in your portfolio. I will definitely be reviewing all the notes I took and editing my work / showreel to this advice. The other things he spoke about would seem like common knowledge but didn't actually click until he pointed it out. Bay Raitt spoke last, such an inspirational person, very talented and amazing to see what he has achieved in his career so far. We should never pass up the chance for the work we love, even if it means living off hardly any more - which Bay did for awhile. If it means getting to do what you're passionate about, just do it. It was amazing to see how much he had taught himself and how many different areas he could adapt to. I need to take note of this and learn as much as I can and different pieces of software!
I can safely say that even though at the moment, I'm looking more into animation within films, all of these talks and speakers have been so inspirational and motivating. I have taken so much knowledge from each of them and can easily transfer this advice into my own area of specialism.


Day 1:
- Lionhead Studios - Jennifer Clixby, Producer and Mike West, Lead Designer
- Ubisoft Reflections - Matthew Oakley and Andrew Willans
- Rhianna Pratchett, Writer
- Naughty Dog - Eric Baldwin, Lead Animator
- Austin Wintory, Composer / Musician
The first day gave me a great insight into the game industry and how Lionhead Studios in particular, worked on each of their Fable games and the challenges they faced with each. Planning is key in order to ship the game out of time. Another thing they mentioned was that it was good to have just one person who had a clear vision for the game, as with their previous games they had a few directors wanting different things and in the end there was confusion between people. Communication is key, you have to be able to pass your ideas down through the departments and also back up to the director. Regular meetings between departments can overcome this but communication at all times plays a big part in any production. Ubisoft Reflections spoke about taking advantage of things that come your way, their studio is well known for the Just Dance games, it may not be your thing but it is one of the best selling games - don't pass up that chance if you get an opportunity like that.
Rhianna Pratchett opened my eyes to how much more there was to writing , I always knew story was a huge part but didn't realise that hiring professional writers was only a recent thing. Before this studios would just get anyone in their team to write, it sounds quite absurd that this has been the case for a long time, you wouldn't get just anyone to code the game, so why should the writers be any different? Eric Baldwin from Naughty Dog showed the process of making their teaser trailer, to make it as realistic as possible they used a lot of reference. They spent a lot of time working on the fine details just to make it that bit more believable and creating new ways/processes of doing things such as footprints on the sand.
The last speaker from the first day was composer, Austin Wintory. It was just so inspiring and moving, to hear how he spoke about music and how music affects so much. It can change the meaning of a game or film drastically, and is also something the viewer can connect with. The work he did on Journey was beautiful and he more than deserved the Grammy he got for it. It shows how recognised games are becoming within the entertainment industry.
Day 2:
- Richard Frankie, Creative Director / Open World Designer
- Indie Development Panel
- IO Interactive - Janus Kirkegaard, Senior Environment Artist
- Epic - Wyeth Johnson, Art Director
- Bay Raitt, Artist and Designer, formerly of Valve
Richard Frankie from the Burnout series talked about the process he went through as an open world designer. A major point he brought up was about iteration, iteration is key. Develop your work and keep changing it. The Indie Development Panel was next, it was interesting to see that a fair few speakers came from AAA games before hand. They mentioned that they found at big studios there is a restriction on creativity there, you got more freedom being indie instead. The downside to becoming an indie developer first, is that there is always the issue of not having more experienced people to guide you, as you would have in the industry. You could miss out on learning certain things. When you do make your first indie game, it's best to create something to test your skills on and so you can work out how to improve from then on. It's easy to set up a company, it's harder to maintain and keep it going. IO Interactive, well known for the Hitman series also attended Animex. It's good to always think about the other disciplines/departments as well as your own when working with others. Whatever you create needs to work for the next person along in the production line.
The most useful and motivational talk for me was from Wyeth Johnson of Epic. It was a really great talk - very eye opening and useful. It really got me thinking about my work in a different way and how I could push it further. What was really helpful is that Wyeth spoke about the do's and don'ts of what to include in your portfolio. I will definitely be reviewing all the notes I took and editing my work / showreel to this advice. The other things he spoke about would seem like common knowledge but didn't actually click until he pointed it out. Bay Raitt spoke last, such an inspirational person, very talented and amazing to see what he has achieved in his career so far. We should never pass up the chance for the work we love, even if it means living off hardly any more - which Bay did for awhile. If it means getting to do what you're passionate about, just do it. It was amazing to see how much he had taught himself and how many different areas he could adapt to. I need to take note of this and learn as much as I can and different pieces of software!
I can safely say that even though at the moment, I'm looking more into animation within films, all of these talks and speakers have been so inspirational and motivating. I have taken so much knowledge from each of them and can easily transfer this advice into my own area of specialism.


Saturday, February 23, 2013
Rendered Alien
The first image below is my final concept of my alien with the colours I planned to use, and the one below that is the fully rendered version. Originally my plan was to have it coloured more towards pink / purple, this was because I got feedback from people of my colour choices to see what they would prefer the most. I quite like the pink choice and so I went down this route for a bit, however as much as it looked quite nice in Photoshop, once I placed it on my alien it looked too much like skin and it didn't have enough depth to it. Instead I decided to take my mesh of my alien into Mudbox where I would be able to paint on a lot more detail. Using the Fur stencil and applying it as a projection I was able to quickly achieve a fur texture. I realised also, that the original uv map I created wasn't suitable enough for painting on, so I had to re-do it.
I wanted to try out Roadkill UV - a freeware application that is a much faster and far simpler way to unwrap models, however it's not available for mac so I passed it onto my friend to do it. The process itself is quite similar to how I would normally create my uv's within Maya. Within Roadkill, you are mainly just cutting edges to separate pieces and to create seams for each piece. As you cut away, Roadkill will automatically unwrap the uv's for you, whereas in Maya you have to tell it to do so and are needed to select many more edges and go through different process before you get to the final layout. It's not great for laying out the pieces of the uv though, so it's best to reposition it within Maya before exporting it out. For Mudbox however, when exporting the geometry the uv's go along with it so unlike with painting in Photoshop where you have to take a UV snapshot, this isn't needed.


I wanted to try out Roadkill UV - a freeware application that is a much faster and far simpler way to unwrap models, however it's not available for mac so I passed it onto my friend to do it. The process itself is quite similar to how I would normally create my uv's within Maya. Within Roadkill, you are mainly just cutting edges to separate pieces and to create seams for each piece. As you cut away, Roadkill will automatically unwrap the uv's for you, whereas in Maya you have to tell it to do so and are needed to select many more edges and go through different process before you get to the final layout. It's not great for laying out the pieces of the uv though, so it's best to reposition it within Maya before exporting it out. For Mudbox however, when exporting the geometry the uv's go along with it so unlike with painting in Photoshop where you have to take a UV snapshot, this isn't needed.


Sunday, February 17, 2013
Rough Edit
As I put in a previous post I created a rough edit of my final film in order to send this off to John who was doing my music. Not only did he need it to compose the music, but it was also good for me to see what I wanted to achieve in the time given. I actually went through quite a few rough cuts, and kept adapting them as I progressed through the project. In my storyboard I originally had a shot of the alien jumping through the branches of the tree, however when it came to animating this it was such a quick shot that it seemed pointless putting it into my final film. I got told that it normally takes the viewer nearly 2 seconds to take in what is on screen and this shot that I had animated was barely 1 second, so it made sense to take it out.
I created an animatic after drawing up my storyboards (which I never got round to posting until now) which gave me a rough timing to work to. At this stage we had filmed some of the footage so I put this in place to see where I would cut each shot. By doing this you are able to get a much clearer idea of timings and I was also able to work out how long my animated shots could be. Seeing as the film itself can't be over 1 minute, I wanted to get a good balance between live action shots and animated ones within Maya. Rough edits really help you plan out your shots and keeps you working to that edit so you don't go off track and create more than you need. It can be a huge time saver in the end as you are not working on bits that will never be shown and also rendering times will be cut down. Also within industry, these rough cuts will also be shown in order to give the go ahead on a project and also give the rest of the team something to work with.
I created an animatic after drawing up my storyboards (which I never got round to posting until now) which gave me a rough timing to work to. At this stage we had filmed some of the footage so I put this in place to see where I would cut each shot. By doing this you are able to get a much clearer idea of timings and I was also able to work out how long my animated shots could be. Seeing as the film itself can't be over 1 minute, I wanted to get a good balance between live action shots and animated ones within Maya. Rough edits really help you plan out your shots and keeps you working to that edit so you don't go off track and create more than you need. It can be a huge time saver in the end as you are not working on bits that will never be shown and also rendering times will be cut down. Also within industry, these rough cuts will also be shown in order to give the go ahead on a project and also give the rest of the team something to work with.
Saturday, February 16, 2013
Spaceship Interior

 When trying to come up with a design for the interior of the spaceship I knew I wanted to keep it simple as I did not want to over complicate things, and also have the possibility of running out of time for completing it. When I was looking for inspiration I came across some hotels that had a very minimalist / futuristic feel to them, especially within their spas. I really liked this design as it was very clean cut and did hold a futuristic feel to it.
I had a rough idea of what I wanted after finding some these spas as inspiration so I drew up a really quick idea and then took it into Photoshop to test out some colours. I knew I wanted my interior to be bright and reflective to add more to that simplicity look and feel. Also as my character was going to fairly colourful, not sticking to the norms of animalistic colour conventions, I didn't want the interior clashing with my character. The colour scheme I came up with was quite muted and when it came to painting the texture for the inside of the dome, it didn't feel right, when placing behind my shot footage, I found that Jeff (my actress) didn't sit very well within the background. It ended up looking too fake and it wasn't something I wanted at all. I felt that if I used a free texture I would be able to achieve a more realistic setting where the two components, both actress and backdrop would be able to fit nicely together.
The last image, you can see is one of my rendered shots. Initially I tried using blinn shaders to achieve a specularity and reflectivity on the objects, however I found that I couldn't control it too well and was not able to get the effect I was looking for. Instead it was suggested by a friend that I use a shader within Maya called: mia_material_x. This shader works really well with mental ray and as you can see, produces really nice reflections. Mia materials can only be rendered using mental ray as well. Because it turned out really well I ended up using it for the floor and on my alien character too. With the floor there is also a bump map plugged into it to give more depth. The alien also needed a reflection map as with using mia_material_x, everything has specularity on it, so you need a map to tell it where to not have it e.g. everywhere apart from the nose and mouth.


Thursday, February 7, 2013
Rigging / Blend Shapes
As my character is a quadruped, I knew the rigging set up would be slightly different so in order to get to grips with this and create a fully working rig, I followed tutorials online which gave me a basis to work from. My previous knowledge of rigging still came into use with mirroring joints and putting in IK spline. I found that researching into a cat's skeleton was really useful as this showed me where to put the joints and also the names. With cats, they have an extra bone on their front legs above what essentially would be the ankle, this allows more movement and flexibility. Because of this set up, the placement of the IK's would be slightly different to how a biped would be, so I added in an extra IK between the joints to allow for this movement. I realised that after I rigged and weight painted the model, I could have done with less joints in the neck as a few of these aren't really needed and it would have been easier to weight paint with a couple less. I originally planned to include joints for the eyebrows as this would allow me more control over this area, however I ended up forgetting to put these in and I would have had to unbind the mesh and do it all over again. Instead I had created blend shapes for the eyebrows, including the main expressions I will need.
Using the component editor was something I came across within the tutorials and found it a really useful tool. By going into component mode you are then able to select certain verts and adjust their influence. This is a more accurate way than just weight painting and allows more control, obviously this should only be used for small areas, areas where it's hard to weight paint or where some adjustments are needed.

When it came to creating the blend shapes I came across a major issue, when using the blend shapes they ended up distorting the mesh in areas that were not modified in any way at all. I was told by my tutor that some way along the line the mesh got distorted from the original one, and seeing as I duplicated the mesh before I bound it every time the blend shape is used, it always wants to go back to how it was, hence the deformations in other areas of the geometry. To try and fix this problem we first unbound the mesh from the rig and exported this out separately, by doing this I then had the original mesh back. I then imported it into the scene I was working on and began to detach all the heads of my blend shapes from the body. Seeing as only the tail and right front foot was affected, I would not have to re-do all the blend shapes again. After this I then re-attached the heads to the new body. At first this seemed like it would work, however in the end the blend shapes became destructive. We found that only a couple were really destructive, so by taking those away and duplicating a blend shape that worked correctly, we used that as the new geometry. This process took longer than I anticipated especially seeing as I had to re-weight paint my character and attach all the controllers again, however it is still better than having a broken character! I have learnt many new things so it wasn't a waste of time, and also by having to re-do certain aspects I understand the process more and am able to do it in a much faster time than before.
Subscribe to:
Posts (Atom)